Composition of UIViewControllers and navigation between them (and not only)

In this article I want to share the experience that we have been successfully using for several years in our iOS applications, 3 of which are currently in the Appstore (Saks Fifth Avenue, Gilt, Appytoy). This approach has proved itself to be effective and we recently segregated it from the rest of the code and designed it into a separate RouteComposer library, which is the main focus of this article. It also can be used as the universal replacement for the Coordinator pattern.
https://github.com/saksdirect/route-composer
But, for starters, let’s try to figure out what is meant by the composition of the view controllers in iOS.
Before I go into the explanations, I will briefly go through what the view controller or UIViewController in iOS means. This is a class inherited from the standard UIViewController, which is the base controller of the MVC pattern that Apple recommends using for developing iOS applications. The UIViewController is used to control the UIView which represents a whole screen or a large part of the screen, processing events from it and displaying some data in it.
Alternative architectural patterns such as MVVM, VIP, VIPER can be used, but with them UIViewController will be used anyway, and this library can be used together with them.

All UIViewController-s can be conditionally divided into Regular View Controllers that are responsible for some visible area on the screen, and Container View Controllers that, in addition to displaying themselves and some of their controls, are also able to display the child view controllers integrated into them.
The standard container view controllers supplied with Cocoa Touch: UINavigationConroller, UITabBarController, UISplitController, UIPageController and some others. The user can create his custom container view controllers following the Cocoa Touch rules described in the Apple documentation.
The process of integrating regular view conrollers into the container view controllers, as well as the integration of the view controllers into the stack of view controllers, will be called the composition in this article.
I will go through why the standard solution for the composition of the view controllers was not an optimal apprach for us. Then I will go through the library we’ve developed that facilitates our work.
Firstly, let’s look at the composition of some standard container view controllers for example:
Examples of the composition in standard containers
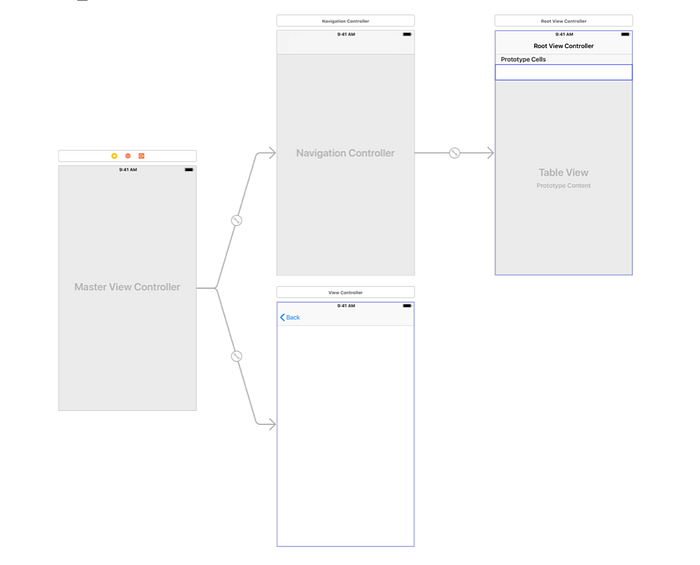
UINavigationController

// Create a container view controller
let tableViewController = UITableViewController(style: .plain)
// Insert first view controller
let navigationController = UINavigationController(rootViewController: tableViewController)
// ...
// Insert second view controller
let detailViewController = UIViewController(nibName: "DetailViewController", bundle: nil)
navigationController.pushViewController(detailViewController, animated: true)
// ...
// Go to the first view controller
navigationController.popToRootViewController(animated: true)
UITabBarController
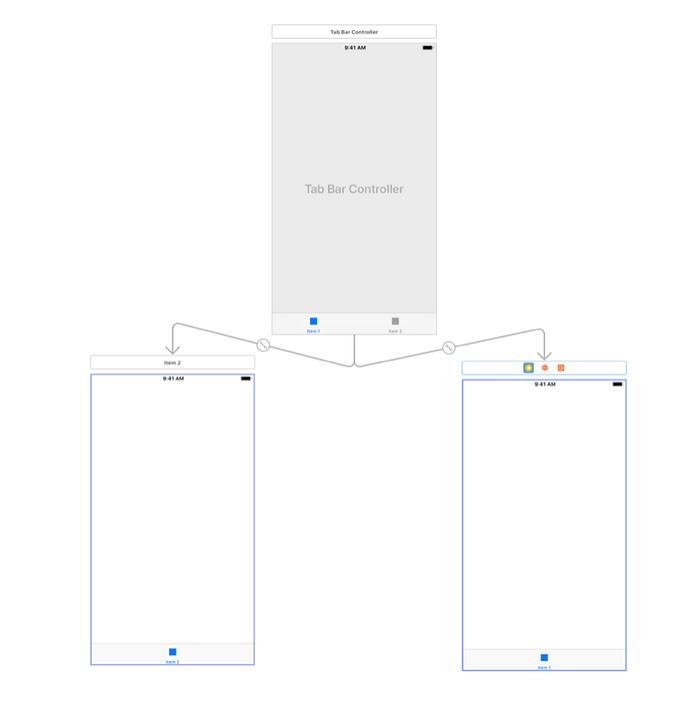
let firstViewController = UITableViewController(style: .plain)
let secondViewController = UIViewController()
// Create a container view controller
let tabBarController = UITabBarController()
// Insert two view controllers in to the container view controller
tabBarController.viewControllers = [firstViewController, secondViewController]
// One of the ways to switch view controllers programmatically
tabBarController.selectedViewController = secondViewController
UISplitViewController
let firstViewController = UITableViewController(style: .plain)
let secondViewController = UIViewController()
// Create a container view controller
let splitViewController = UISplitViewController()
// Insert first view controller
splitViewController.viewControllers = [firstViewController]
// Insert second view controller
splitViewController.showDetailViewController(secondViewController, sender: nil)
Examples of integration (composition) of controllers on the stack
Setting the View Controller as the Root
let window: UIWindow = //...
window.rootViewController = viewController
window.makeKeyAndVisible()
Modal presentation of the view controller
window.rootViewController.present(splitViewController, animated: animated, completion: nil)Why we decided to create a library for the view controller’s composition
As can be seen from the examples above, there is not a single way to integrate view controllers into containers, nor is there a way to build the view controllers into a stack. Also, if you want to slightly change the look of your application or the way a user navigates in it, you need to make significant changes to the application code. You will also need to keep references to the container view controllers so that you can insert your view controllers in them, etc. The standard method itself infers a fairly large amount of work, as well as the availability of references to the view controllers for generating actions and presenting of other view controllers.
All this adds to the headache of various methods of deep-linking to the application (for example, using Universal links), since you have to answer the question: what if the controller that has to be shown to the user, after he has clicked on a link in Safari, is already shown or the view controller which should show it has not yet been created and so on. All these cases force you to walk around the tree of the view controllers and write code which makes your eyes bleed and which every iOS developer tries to hide. In addition, unlike Android architecture where each screen is built separately as an independent app, in iOS to show some part of the application immediately after the startup, it may be necessary to build a fairly large stack of the view controllers that will be hidden under the one that will be displayed.
I’ll also add that this will all be multiplied by N as soon as your marketing team expresses a desire to conduct A / B testing on live users:
- Let’s show the Tab Bar to 50% of the users, and the Hamburger menu to the other half. Then in a month we’ll tell you which users see more of our special offers.
Often, our applications consist of a huge number of screens developed by different teams, and to get to one of the screens during development, you need to go through another screen that may not have been implemented yet. In our company, we used an approach that we call a Petri dish. Where in the development mode, a list of all application screens is available and the developer or the tester can go to any of them (of course some of them may require some input parameters).

Developers can interact and test them individually and then assemble them into the final application for production. This approach greatly facilitates the development, but, as you saw from the examples above, the hell that is composition begins, when you need to keep several ways to integrate the view controllers into the stack.
It would be nice to just call methods like goToAccount() , goToMenu() or goToProduct(withId: "012345") when the user clicks on a button or when the application receives a universal link from another application and does not think about how this view controller will be integrated in to on the stack, knowing that the creator of this view controller already provided this implementation.
I’ll try to tell you how we came to this problem and eventually allocated it to the RouteComposer library.
Route Composer
After analyzing all the scenarios for composition and navigation, we tried to abstract the code given in the examples above and identified 3 main entities of which the RouteComposer library consists and operates — Factory, Finder, Action. In addition, there are 3 auxiliary entities in the library that are responsible for small tuning that may be required in the navigation process - RoutingInterceptor, ContextTask, PostRoutingTask. All these entities must be configured in a chain of steps and passed to the Router object, which will build your stack of view controllers.
Here’s a bit about each of them in order:
Factory
As the name implies, the Factory instance is responsible for creating a view controller.
Here it is important to take a moment to go over the concept of the context. Within the library, we call context everything that a view controller may need to be created. For example, in order to show the view controller displaying the details of the product — it is necessary to give it a certain productID, for example, typed to a String. The instance of the context can be anything: an object, a structure, a block, or a tuple. If your controller does not need anything to be created - can the context be specified as Any? and set to nil.
For example:
From the above implementation, it becomes clear that this factory will instantiate the view of the view controller from the XIB file and pass the transmitted productID into it. In addition to the default Factory protocol, the library provides several standard implementations of this protocol in order to save you from writing a boilerplate code (in particular, shown in the example above).
Further down I refrain from bringing the descriptions of the protocols and examples of their implementations, since you can be thoroughly familiarized with them by downloading the example app supplied with the library. There are various implementations for regular view controllers and container view controllers, as well as ways to configure them.
Action
The instance of Action represents a way to integrate the view controller, which will be built by the factory, into the stack. The view controller cannot just hang in the air after the creation, and therefore, each Factory must contain Action as seen from the example above.
Here is an exaple of the Action implementations that presents the view controller modally:
The library contains the implementation of the most standard ways of integrating the view controllers into the stack. You probably do not have to create your own actions until you use a custom container view controller or presentation method. However, creating a custom Action should not cause problems if you get acquainted with the examples.
Finder
The instance of Finder provides the router the answer to this question: "Is there already such a view controller created and is it already on the stack? Perhaps nothing is needed and it is enough to show what is already there?.
If you keep references to all the view controllers you create, then in your Finder implementation you can simply return a reference to the desired view controller. However, often this is not the case, because the application stack, especially if it is large, changes quite dynamically. In addition, you can have several identical view controllers in the stack showing different entities (for example, several ProductViewController showing different products with different productIDs), so the Finder protocol may require custom implementation and search for the corresponding view controller in the stack. The library facilitates this task by providing StackIteratingFinder as an extension of the Finder - a protocol with the appropriate settings, allowing to simplify this task. In the implementation of StackIteratingFinder you only need to answer the question: is this view controller the one that the router searches for?
An example of such an implementation:
Auxiliary entities
RoutingInterceptor
RoutingInterceptor allows you to perform some actions before the actual navigation process starts. Then it tells the router whether it can integrate the view controllers on the stack. The most common example of such a task is authentication (but not trivial in implementation). For example, you want to show the view controller with details of the user account, but to do so the user must be logged into the system. You can implement RoutingInterceptor and add it to the configuration of the account view controller and check inside: if the user is logged in - allow the router to start navigating, if not - show the view controller that prompts the user to log in and if this action succeeds - allow the router to continue navigation or cancel it if the user refuses to log in.
The implementation of such RoutingInterceptor with comments is contained in the example supplied with the library.
ContextTask
The instance of ContextTask, if you provide it, can be applied separately to each view controller in the configuration, regardless of whether it was just created by the router or was found on the stack, if you just want to update the data in it or setup some default parameters (for example, to show the "Close" button if it is a modal presentation or not).
PostRoutingTask
The PostRoutingTask implementation will be called by the router after the successful integration of the view controllers into the stack. In its implementation it is convenient to add some analytic task or call some services.
More details on the implementation of all described entities can be found in the documentation for the library and also in the attached example.
PS: The number of auxiliary entities that can be added to the configuration is unlimited.
Configuration
All these described entities are good in that they break up the composition process into small, interchangeable and easily tested blocks.
Now let’s move on to the most important thing — the configuration, that is, to connect these blocks to each other. In order to collect these blocks together into a composition step and merge them into a chain of steps, the library provides the builder class StepAssembly (for containers - ContainerStepAssembly). Its implementation allows you to chain the composition blocks into a single configuration object like beads to a string, and also specify dependencies on other view controllers configurations. What happens to the configuration object in the future depends on you. You can pass it to the router with the necessary parameters and it will build you a stack of view controllers. You can then save it to the dictionary and use it later by the key - depending on your specific task.
Let’s consider a simple example: When user clicks on a cell in a table view with the list of the products or the app receives a universal link from safari or an email client, we need to show the product view controller with a certain productID modally. In this case, the product view controller should be built inside the UINavigationController, so that it can show its name and close the button on its navigation bar. In addition, this product can only be shown to users who have logged in to the system, otherwise they will be asked to log into the system.
Implementation this example without using a library, it will look something like this:
This example does not include the implementation of universal links. These will require the isolation of the authorization code and the preservation of the context where the user should be sent after. Also it will require additional implementation if, suddenly, the user clicked a link, but this particular product is already shown to the user and so on, which, in the end, will make the code very hard to read.
Implementation of this example using the library:
If we translate this into human language:
- Verify that the user is logged in, and if not, prompt to do so
- If the user has successfully logged in, continue
- Search for product view controller using
Finderprovided - If found, make visible and finish
- If it was not found, create a
UINavigationController, integrate it with the view controller created by theProductViewControllerFactoryusingPushToNavigationAction - Embed the
UINavigationControllerusingPresentModallyin to the stack from the current view controller
Configuration requires some study as with many complex solutions, such as the AutoLayout concept. At first glance, they may seem complicated and unnecessary. However, the number of tasks solved by this code snippet encompasses all aspects from authorization to deep-link. Breaking them into sequences of actions makes it easy to change the configuration without having to make changes to the code.
In addition, the implementation of StepAssembly will help you avoid problems with an unfinished chain of steps, and type control - problems with the incompatibility of input parameters for different view controllers.
Consider a pseudo-code of a full application in which ProductArrayViewController displays a list of products in a certain ProductArrayViewController. A user then selects a certain product. Showing it depends on whether the user is logged in or not. I the user isn't it offers a chance to log in and displays the product after a successful login:
Configuration Objects
Implementation of the list of products
Implementation of Universal Links
And there you have it! Everything that was required to realize all the conditions from the example.
It should also be mentioned that the configuration can be much more complicated and consist of dependencies (See here). For example, if you need to show a product not only from the current view controller, but also if the user came to it via a universal link, then under it there must be a ProductArrayViewController, which must be inside the UINavigationController after some HomeViewController. Then this can all be specified in the configuration StepAssembly using from(). If your application is fully covered by RouteComposer, it will not be difficult (see the example app in the library). In addition, you can create multiple implementations of Configuration and pass them to the view controller to implement different composition options. Or you can choose one of them if your application is carrying out an A / B test, depending on which focus group your user belongs to.
Instead of conclusion
At the moment, the approach described above is used in 3 applications in production and has proved itself well. Splitting the composition task into small, easily readable, interchangeable blocks makes it easier to understand and search for bugs. The default implementation of Fabric, Finder and Action allows you to start configuration immediately for most tasks without having to create your own. And most importantly, what this approach provides is the ability to autonomously create a view of controllers without having to bring in your knowledge about how they will be built and how the user will move in the future. The view controller must only call the desired configuration by the user's action. This call itself can also be abstracted (see Images module in the example app where each view controller is a separate framework, and there is 2 ways of composing them provided - with or without the library).
The library, like its implementation of the router, does not use any tricks with objective c runtime and completely follows all Cocoa Touch concepts, only helping to break the composition process into steps and perform them in any given sequence. The library was tested with versions of iOS from 9 to 12. It already supports swift 4.2 as well.
This approach fits into all architectural patterns that imply working with the UIViewController stack (MVC, MVVM, VIP, RIB, VIPER, etc.). It also can be used as the universal Coordinator pattern.
The library is in active development and as I already mentioned above, it is used in production. I would recommend trying out this approach and sharing your impressions. In our case, this allowed us to get rid of a lot of headaches.
I will be happy with your comments and suggestions.
PS: There is a second part of the article with some configurations examples. And a third part about the Coordinator pattern and the RouteComposer library.
PPS: If you like the library, do not forget to give it a star on GitHub!
